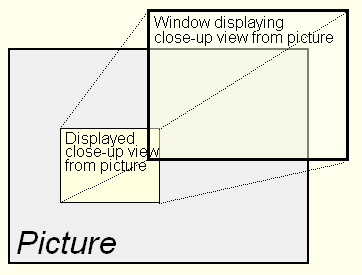
The layers in the picture enable the control of the object visibility which depends on the Picture zoom size. The object visibility is defined in layers. The layer visibility is defined from zoom.

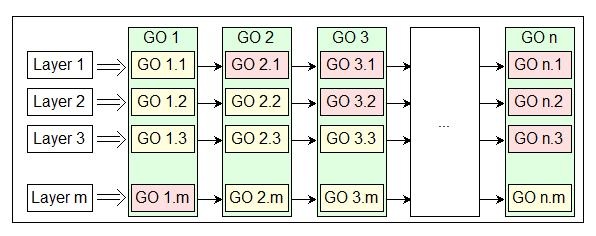
The data model of graphic objects (GO) which did not support the layers was as follows:

Objects are drawn in order and according to their visibility. In the multilayer implementation of the pictures, their definitions contain also the layers.
The data model of graphic objects for picture drawing:

Layer visibility is evaluated during drawing. If a layer is visible it will be drawn. Objects are drawn in the layer only if they are defined as visible in this layer.
The properties of this solution can be better understood by looking at the pictures mentioned above - they show only the principle of the new picture attribute - layers.
The data model of graphic objects which did not support the layers:

Multilayer data model of graphic objects for the picture drawing:

Objects in layers share RefId for connecting for display and control.
Mode Visibility in layer is added. This mode enables to set the parameters of object attributes and modifies them for individual layers.
For example, the Text "Zilina" displayed in layer No. 1 can be replaced by the text "Zilina - No. of the train sets 10" in layer No. 5.
Font, colour, placement, etc. can be also changed.
Displaying in HI
- During the drawing of the Picture, the layer visibility is evaluated according to zoom. A visibility layer will be drawn. Objects will be drawn in the layer only if they are defined as visible in this layer. The script is informed about the change of layer by entry OnNewLayer.
- Picture zoom is done through Windows facilities but there are some objects that can not be zoomed in/out. Their size and placement are set by the script. The script is informed about the change of zoom by entry OnPictZoom.
- Choosing the zoom mode, the aspect ratio is kept at the rate of 1:1. The ratio in the display is affected by picture size. It means that if the display ratio is changed - e.g. only one side is expanded - this change is kept also in zoom.
- Changes in object attributes from the script relate only to some layers. This can be set with the function %HI_LayersParams (function sets the attributes for the active layer, all layers or for a range of layers).
- The following functions can set the displaying of layer and zoom script:
- The active layer can be detected by the function %HI_GetCurrLayer.
Controlling graphic objects from a script
When defining the parameters of graphic objects from a script, you may define the particular layers for which the parameters will be applied by %HI_LayersParams. It is applied to the pictures with layers. The default setting is applied for the active layer, but you may define it also for all layers or for the range of layers.
Creating Pictures with layers
Pictures with layers are created in the graphic editor.
- In the window Picture settings, you may define the layer parameters (quantity and reduction ratio, which layers are visible, for example, No. 5 means drawing ratio 1:5).
- The zoom resolution in Layer 1 (basic layer) is 1:1 (e.g. picture resolution 8000:6000 in which the picture has been created).
- There are two icons to work with layers in the toolbar of D2000 GrEditor:
 Set active layer - it sets a top layer and zooms according to it.
 Paint all layers - displays all objects that are drawn in all layers.
- You may choose the active layer with the CTRL key + the number of the required layers when drawing the picture.
- Objects in picture dialog box, option All, provides the information on whether the object is zoomed in/out (Z) and in which layers it has been used (1,2,3,...).
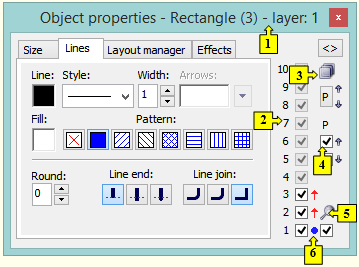
- Dialog box Object properties also supports the work with layers.

|
| 1 | The number of active layers is displayed in the title bar. |
| 2 | The checkboxes (1..10) indicate in which layers the object is drawn. If the picture does not have any layers, the checkboxes are disabled. |
| 3 | Copying parameters between the layers. Click the button "P" to show more options. |
| 4 | The checkboxes, situated below the P symbol (layer parameters), allow the application changes of parameters automatically for both previous and following layers in the object. |
| 5 | The symbol Magnifier indicates whether the object is zoomed during the zoom change. If the checkbox is not checked off, the object will not be zoomed. Its size and position will be set by a script. Script is informed about the change of zoom size by entry OnPictZoom. |
| 6 | Next to layers, there is the information into which layers the change of parameters will be copied. Meaning of symbols:
- Blue circle - is displayed on the active layer. It is a working layer where the object parameters can be changed.
- Red arrows – they relate with point 4. They display the selection at the layers - all parameters will be copied from the working layer into the layers with these arrows.
- Pink arrows - they are displayed when the settings according to point 4 are not applied, but the object contains the internal flag, which tells that the changes should be copied to all layers (e.g. when creating a new object).
- Blue arrows - they are displayed when the settings according to point 4 are not applied, but the object contains the internal flag, which tells that only the position changes should be copied to all layers. However, a new position is not transmitted into layers, but the size of a change is added to the position on the layer.
- Grey symbol - displayed when no object is selected.
|
|
Picture drawing
- A new graphic object will be created in all layers. The changes in its parameters will be applied on all layers until any parameter in the other layer is changed. Then object parameters will be changed in the active layer and also in the layers which are checked off in dialog box Object properties.
- Concerning the replicated graphic object, the change of position will be applied in all layers by the same change until any parameter in another layer is changed. Then object parameters will be changed in the active layer and also in the layers which are checked off in dialog box Object properties.
- Concerning the graphic object, created as a copy of other objects by mouse or hotkeys, the change of its position will be applied in all layers by the same change until any parameter in the other layer is changed. Its position parameters will be changed in the active layer and in layers marked by checkboxes in Object properties palette. Graphic object, created as a copy of other objects via clipboard by CTRL+C, CTRL+X and CTRL+V, will be placed in all layers top left. This object is moved only in the active layer.
- Objects can have different parameters in each layer. These parameters are changed in dialog box Object properties.
- The setting of parameters in dialog box Connect objects is the same for all layers.
- Changing the layer cancels creating the object but creates the selection when selecting the object by clicking on it.
- If an object of the group is not visible in some layer, it is as if it were "removed" from the group in the given layer. It means that it is still in the group but it is not included.
Selecting objects
Conditions that are applied for the selection of objects in the pictures with layers:
- Each layer should contain the list of selected objects that will be used when changing the layer. If the layer, which is defined, has not the selected objects, then the objects from the active layer will be used.
- Creating a new object by drawing or copying causes the new object to be selected in all layers.
- The object(s) are selected only in one layer (selection in other layers is not changed).
Copying objects
- When copying the objects through the clipboard, the objects will be inserted into each layer in the top left visible area.
Copying objects between the pictures with different number of layers
- When copying objects from the picture with the layers into the picture without layers, only objects from the active layer will be copied (for example, if layer 3 is an active layer, the objects only from this layer will be copied).
- When copying objects to the picture with more layers than the original picture - data on the remaining layers up to the maximum layer will be set according to the last layer of the original picture.
- When copying objects to the picture with fewer layers than the original picture - only valid layers will be copied, and the remaining layers up to the maximum layer will be set according to the last layer of the target picture.
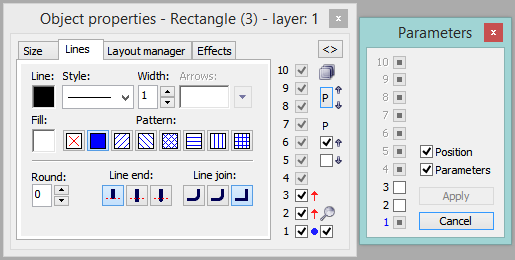
 Copying parameters between the layers
To show the options for copying the parameters between the layers, click the button "P".

The checkboxes 1-10 represent the layers to which data can be copied from the active layer.
Position - the position parameters will be copied.
Parameters - all parameters except for the position will be copied.


 Set active layer - it sets a top layer and zooms according to it.
 Paint all layers - displays all objects that are drawn in all layers.
