The SmartWeb platform enables effective development of web applications that use the D2000 application server as a data source, meaning that they have application logic programmed in the D2000 application server. Thanks to direct usage of standard web technologies such as HTML, CSS, and JavaScript, the applications' design is not limited by graphics possibilities of D2000. Knowledge of these technologies is thus a necessity for developing applications on the SmartWeb platform.
Introduction to Development of Applications
Requirements for Developing
- Installed Git
- Development environment for HTML and JavaScript (e.g. WebStorm)
- Web browser (at least Internet Explorer 11, Google Chrome is recommended)
Application Bundling
In applications on the SmartWeb platform, it is possible to use JavaScript language constructions up to the ECMAScript 2017 version and React components which use JSX syntax regardless of the final used web browser. This is possible because applications created on the SmartWeb platform go through a process called bundling during which they are deployed into a production version. This process makes adjustments of source codes (transpilation) so that they would be natively interpretable by the lowest supported version of a web browser (translations to the JavaScript of ES 5.0 version). At the same time, the size of source codes is reduced during the bundling process - minification (removing empty characters and commentaries, shortening of names of variables and functions...). It spares transmitted data and thus enables quicker loading of web pages.
Application Configuration
The smartweb.json file serves for configuration of the SmartWeb application. In this file, it is possible to allow or forbid individual components of the application, to set an authentication method, to restrict access to Event scripts and RPD procedures. A detailed description of the configuration can be found in the chapter Configuration of the SmartWeb Application.
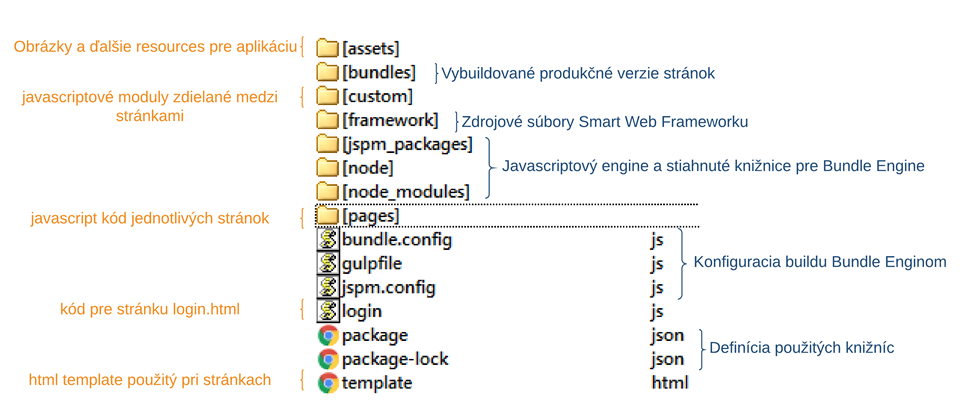
Application Structure
The following figure shows the structure of the SmartWeb application.
On the left, there is a description of files which the programmer creates. Those are mostly files of individual pages (pages directory), a page for a login of a user (login.js) and an HTML template of pages (template.html). JavaScript modules shared among pages are located in the custom directory and for storing other files such as pictures, there is the assets directory.
On the right, there are described files generated or copied by the SmartWeb Bundle Engine. Those are mostly built production versions of pages, files of the SmartWeb framework and the JavaScript engine with downloaded libraries for the bundle engine.
External Libraries
Thanks to the usage of SystemJS and JSPM, it is possible to use any JavaScript library from GitHub and npm in the SmartWeb application. Dependencies and possible conflicts will be automatically resolved in versions.
Development of Applications
SmartWeb applications are standardly composed of more web pages. Pages may be written directly as HTML (suffix .html) files or as JavaScript files (suffix .js) which will be using templates (template.html) mapped on the HTML file (e.g. the index.html page is created by a combination of the file template template.html and the file index.js). The file template.html represents a template of a web page using which it is possible to define repeated parts of final pages. Only mandatory HTML element of the template is the element of the <div> type with id "root". Content of this element will be generated based on a particular JavaScript file which is mapped to a final HTML file. In the template, it is possible to use several placeholder variables in SmartWeb. Those will be automatically replaced by their real value during loading of the page.
- {{{smartweb.global.context.path}}} is the url path to the root directory of the SmartWeb server derived from the name of the deployed "war" file of the Wildfly application server. (e.g. /smartWeb).
- {{{smartweb.application.root.path}}} is the url path to the root directory of the web application derived from how it is defined in the smartweb.json. configuration file (e.g /smartWeb/admin).
- {{{smartweb.application.script}}} contains a code of the SmartWeb application
- {{{smartweb.library.scripts}}} contains a code of the used libraries in the SmartWeb application
The following code represents an example of the template.html file in which there are defined the basic styles, scripts and an icon of the web page:
<!DOCTYPE html>
<html lang="en">
<head>
    <meta charset="UTF-8">
    <meta http-equiv="X-UA-Compatible" content="IE=edge">
    <meta name="viewport" content="width=device-width, initial-scale=1">
    <title>SmartWeb Demo</title>

    <link rel='shortcut icon' type='image/x-icon' href='{{{smartweb.application.root.path}}}/custom/img/favicon.ico'/>
    <link href="{{{smartweb.application.root.path}}}/assets/fonts/font-awesome/font-awesome.css" rel="stylesheet">
    <link href="{{{smartweb.application.root.path}}}/assets/fonts/font-open-sans/open-sans.css" rel="stylesheet">
    <style>
        .gray-bg {
            background-color: #f3f3f4;
        }
    </style>
    {{{smartweb.library.scripts}}}
</head>
<body class="fixed-nav top-navigation gray-bg">
    <div id="root"/>
    {{{smartweb.application.script}}}
</body>
</html>
It is possible to define own template file (always named template.html) for every directory under the root directory of the SmartWeb application. If there is no template file in the directory with the Javascript code of the page, it will be automatically looked for in the directory structure above until the template will be found.
All pages defined under the /pages directory require an authentication. If the user is not authenticated, they will be automatically redirected to the /login.html page which contains a login form and realizes the authentication. The default page to which the user is redirected after entering the address of the SmartWeb application is /pages/index.html. Pages defined outside the /pages directory do not need authentication.
Application Debugging
It is very difficult to debug pages in their final form because they go through transpilation and minification processes during bundling when they are being deployed into the production version. Therefore, there was a special developing (debugging) mode created in which the page is sent into the web browser in its original form and the necessary code adjustments such as transpilation are realized only afterward directly in the web browser. This mode (if allowed) is activated by a keyboard shortcut CTRL+ALT+D, more precisely by adding the ?DEV parameter after the name of the loading page. Loading a page in the debugging mode lasts longer because all source codes are read in their original forms without optimization and in addition to that, in a browser using the javaScript, they are transformed for securing compatibility with the web browser.
Changes on the page can be seen only by logged in users who access the page via the debugging mode. Work of other users with the production version of the page/application is not affected in any way.
Application Rebundling
After debugging changes in the application for their deployment into production, it is not necessary to restart the web server. If it is allowed in the configuration, using the keyboard shortcut CTRL+ALT+R, more precisely by adding the parameter ?REBUNDLE after the page name, application rebundling on a server will run.
Approaches to Web Application Development
The SmartWeb platform enables high flexibility from the point of view of web application development. A programmer can choose which interface and which parts of the SmartWeb platform will be used to access.
Own UI (interface) and REST API
In this case, a programmer has complete freedom from the point of view of creating the UI of the web application. For communicating with D2000, they use REST API which enables calling D2000 RPC and SBA procedures and reading data from archives.
The following code represents an example of a page without the use of the SmartWeb Framework only with the use of D2000 REST API. To prevent an attack such as cross-site request forgery, it is necessary to add the CSRF token into every REST request. Using AJAX request, the RPC procedure Sum is called on the event E.SmartWebTutorial through the REST API. The procedure has three parameters - the first two input parameters are submitted by value and the third returning parameter of the real type will be inserted into the attribute named vysledok. A thorough description of the data serialization is available on the page Serialization of Data between Client and API Interface.
<!DOCTYPE html>
<html lang="en">
<head>
    <meta charset="UTF-8">
    <meta http-equiv="X-UA-Compatible" content="IE=edge">
    <meta name="viewport" content="width=device-width, initial-scale=1">
    <title>SmartWeb Demo</title>
    <script src="https://code.jquery.com/jquery-3.3.1.min.js" integrity="sha256-FgpCb/KJQlLNfOu91ta32o/NMZxltwRo8QtmkMRdAu8=" crossorigin="anonymous"></script>
    <script src="https://cdn.jsdelivr.net/npm/js-cookie@2/src/js.cookie.min.js"></script>
</head>
<body class="">
<div id="root">
    <h1>Stranka bez využitia SmartWeb Frameworku 2</h1>
    <div>
        <input id="inputA" type="text" value="10">
        <span style="background-color: rgb(238, 238, 238);"> + </span>
        <input id="inputB" type="text" value="20">
        <span>
            <button id="button1" type="button"> = </button>
        </span>
        <input id="inputC" type="text" class="form-control" disabled="" value="">
    </div>
</div>
<script language="JavaScript">

    function loadData(valueA, valueB) {
        // Cretaes or reads unique CSRF token for preventing cross-site request forgery
        var csrfToken = Cookies.get('CSRF-TOKEN');

        $.ajax({
            url: `/smartWeb/api/web/rest/v0/d2/rpc/E.SmartWebTutorial/Sum?CSRF-TOKEN=${csrfToken}`,
            type: 'POST',
            data: JSON.stringify([
                valueA, valueB, {type: 'real', returnAs: 'vysledok'}
            ]),
            async: false,
            cache: false,
            contentType: "application/json; charset=utf-8",
            dataType: "json",
            processData: false,
            success: function (data, status, jqXHR) {
                $('#inputC').val(data.vysledok.value);
            },
            error: function (jqXHR, status) {
                // error handler
                console.log(jqXHR);
                alert('fail' + status.code);
            }
        });
    }

    $(document).ready(function () {
        $('#button1').on('click', function () {
            var valueA = parseFloat($('#inputA').val());
            var valueB = parseFloat($('#inputB').val());
            loadData(valueA, valueB);
        });
    });
</script>
</body>
</html>
Own UI and (Comet) D2Api
Another possibility when developing a web application is using the D2Api interface which is implemented with the use of the CometD library. This interface, unlike the REST interface, enables also the so-called server push communication which means that data could be sent to a client from the server anytime without the client asking for them beforehand. This form of communication is advantageous mainly in the case when it is desired to publish value changes in D2000 on the web page in real time.
React/SmartWeb Components and (Comet) D2Api
This case fully takes advantage of the features and possibilities of the SmartWeb Framework. The SmartWeb Bundle Engine takes care of independence of libraries and the right order of modules before calling them and it also takes care of the backward compatibility of JavaScript codes by transpilation and optimizes the size of the code. D2Api callings are packed in the DataContainer class which takes care of automatic initialization of connection through D2Api. Moreover, React Components prepared in advance that support responsive design using Bootstrap framework are at disposal.
The following example renders the objects.html page. The ObjectsPage class is the React component defining the design and behaviour of the page. DataContainer is a special React component that realizes a connection to D2000 and promotes into the page the property this.props.d2 that represents the instance of the D2Api class serving for communicating with D2000. The page uses ValueComponent components prepared in advance for acquiring current values of D2000 objects - in this case, a minute (object Min) and a second (object Sec).
import React from 'react'
import {DataContainer, PageHeader, ValueComponent} from '../custom/components'

DataContainer.renderComponent(class ObjectsPage extends React.Component {
    constructor() {
        super();
    }

    render() {
        return (
            <div className="container-fluid">
                <PageHeader {...this.props}/>
                <div className="wrapper wrapper-content page-heading">
                    <div className="row">
                        <div className="col-xs-8 text-right">
                            <span>Current minute from D2000:</span>
                        </div>
                        <div className="col-xs-4 text-right">
                            <ValueComponent d2={this.props.d2}
                                            datasource="Min"
                                            numberFormat="0"
                                            missingFormattedValue="?"/>
                        </div>
                    </div>
                    <div className="row">
                        <div className="col-xs-8 text-right">
                            <span>Current second from D2000:</span>
                        </div>
                        <div className="col-xs-4 text-right">
                            <ValueComponent d2={this.props.d2}
                                            datasource="Sec"
                                            numberFormat="0"
                                            missingFormattedValue="?"/>
                        </div>
                    </div>
                </div>
            </div>
        );
    }
});
Pridať komentár