Selection window
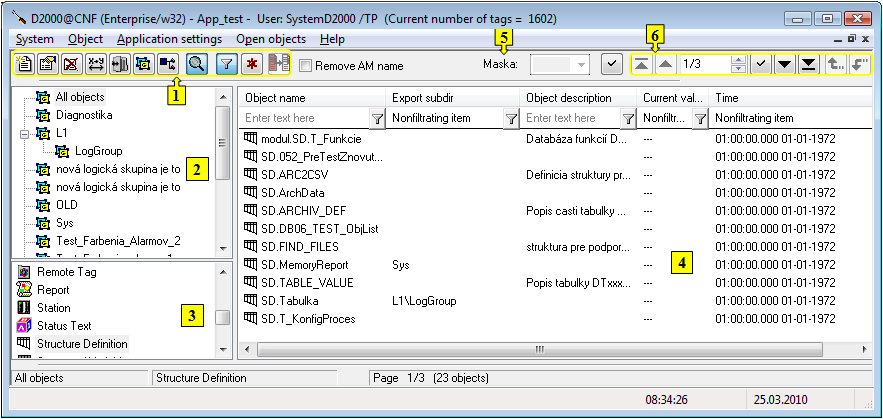
Selection window includes the list of D2000 system objects. The list can be arranged by object types, membership in logical groups or possibly can be filtrated by a mask or by CNF filter.
Window can be divided into these logical parts:
- Functional buttons (1)
- Tree view of logical groups (2)
- List of object types (3)
- List of objects (4)
- Mask (5)
- Paging controls (6)
Functional buttons
Using the function buttons you can carry out various operations with chosen D2000 system objects. Their number and arrangement can be different in various windows and their presence depends on the purpose and usage of given selection window. Last used button stays pressed and its function can be carried out either by repeated pressing or by double-click on selected object in the list. The scale of displayed information is given by the presentation type:
- Simple
Set of displayed information in the list is limited and the same for all object types. An advantage of this mode is smaller data quantity transmitted from process Server to process D2000 CNF, consequently the list responds more quickly to user's actions. Buttons, assigned to forbidden actions, are displayed, but non-functional.
- Full
This mode allows to display all configuration features of objects and all the buttons in the list are available.
The following list includes all the possible function buttons.
| Creates a new object. | |
| Allows to edit selected object. | |
| Deletes the selected object(s). It is not possible to delete the object used by another object. In case of this situation, the system warns about this and offers the possibility to show the objects list that use deleted object. | |
| Assigns the selected object(s) to logical groups. | |
| Renames the selected object. | |
| Shows the object dependency. | |
| Inserts the selected object into archive list (available only if the object list is in the full presentation mode). | |
| Selects (inserts) the object. | |
| Changes the representation of the list: Simple/Full. | |
| Editing the access rights to object group | |
| Adds selected object group(s) with "Read" access to the user. | |
| Adds selected object group(s) with "Control" access to the user. | |
| Adds selected object group(s) with "Modify" access to the user. | |
| Adds selected object group(s) with "No access" access to the user. | |
| Editing object groups | |
| Assigns selected object(s) to the logical group. | |
| Assigns selected object(s) along with its children to the object group. | |
| Switches on / off the filter. | |
| Clears all filter parameters. | |
| Updates parameters of selected objects en masse. | |
| Filter start-up. Button is active only if a criteria for filter is entered into column. |
Tree view of logical groups
As all objects of D2000 system, as objects of User and Object group types can be assigned to logical group. If you select any group in the list of logical groups, only the objects, which are members of the selected group, will be displayed in the list of objects.
The group named All objects is not a logical group. If the group is selected, all objects, regardless of membership in groups, will be displayed.
List of object types
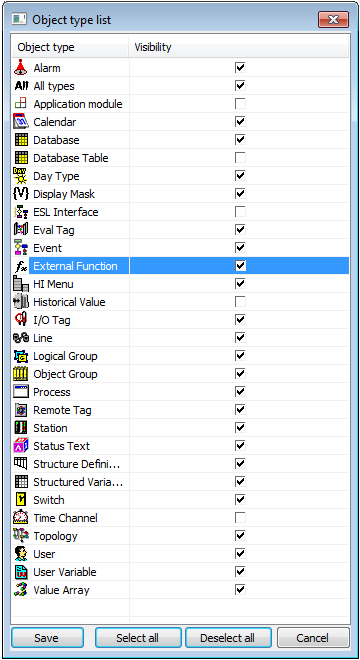
List of object types depends on process and purpose of using the selection window. Each object type has its own typical icon left from the type name. The same icon is to be used in the list of object for each object in dependence on its type.
This list of objects can be changed (reduced) as necessary via the context menu. It will display after right-clicking the list of objects.
In this menu user may hide the selected object type (Exclude), or display the list of all types of objects and set visibility as necessary (Settings).
List of objects
List of objects is placed on the right side of selection window. It contains only the objects of the type
selected in the list of object types and that are assigned to selected
logical group.
The list can be arranged by a mask.
If an object in the list of objects has any children, its name is enclosed in square brackets. Pressing ALT + double-click the object or clicking the button opens a list of its children.
Clicking on the name of a column will arrange rows in the object list according to the column. Objects are always arranged in ascending order. You can arrange the object list just according to the columns Object name, Modify time, HOBJ and Export subdirectory. The column, according to which the list is arranged, contains the character "^" before its name.
In some cases you need to select several objects. Pressing the key SHIFT + clicking the object selects more objects
together. Pressing the key CTRL and left-click selects or unselects an object.
CTRL+A - selects all the objects displayed in the current page.
CTRL+B - copies the name of currently selected object into the Clipboard.
CTRL+N - copies the name of the currently selected object into the mask input field.
CTRL+C - copies visible configuration parameters into the Clipboard.
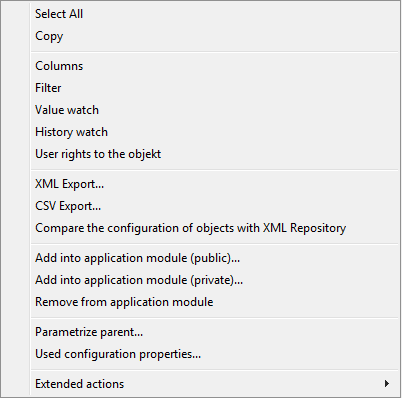
Pressing the right mouse button over the right list opens the following menu with the items:
| Select All | Selects all the objects displayed in the page of the list. |
| Copy | Copies the selected objects in the text form (divided into columns) into the clipboard. |
| Columns | Opens the dialog box to configure the table columns, i.e. displaying of columns for selected object type. In case of the mode Simple list, the column list is the same for all object types. |
| Filter | Opens the dialog box to define more complicated selection conditions for mask. (D2000 CNF, D2000 GrEditor). |
| Value watch | For all selected objects, opens the dialog box allowing to browse / set their values. |
| XML Export | Opens a dialog window to choose XML Export directory and exports the chosen objects to it according to selected export settings. |
| CSV Export | The item is available when all selected objects are of the same type. The
dialog window opens to choose where the CSV file will be save. The selected
objects will be exported into this file according to defined parameters. Setting of export CHECK_EXP, ZERO_HOBJ, SYS_VARS and GROUP_SOFT influence the CSV export. Setting of export WITH_CHILD, WITH_REFER, FILE_TIME, UTF8_ENC, SUBDIR_EXP and EXP_LOGS are ignored (their value is always False). If the exported objects contains binary data and some of them already exist in the selected directory the user must confirm/refuse their overwriting. If the data overwriting is refused the CSV export will be cancelled. Note: CSV Export cannot be used for the objects of Calendar type. |
| History watch | Opens dialog window that allows to browse the object history (creating, modification, deleting). |
| User rights to the object | Opens the dialog window Security Browser. It contains the list of object groups which the object belongs to together with the end users. |
| Compare the configuration of objects with XML Repository | Compares all the selected objects with XML Repository and shows Module to display information from comparing. |
| Add into application module (public) | Opens dialog window to select the application module and adds the chosen objects to the public members of application module. If the object has already been included in the application module, its membership will be changed. |
| Add into application module (private) | Opens dialog window to select application module and adds the chosen objects to the private members of application module. If the object has already been included in the application module, its membership will be changed. |
| Parameterize parent | Opens dialog window to select the parameter of application module and assign the parameter to selected objects. The objects must belong to same application module and their parent must be the same. |
| Remove from application module | Removes the selected objects from the application module. |
| Used configuration properties | Displays the used configuration properties of the selected objects belonging to the application modules. |
| Extended actions | Contains other actions related to work with objects. It is available only if at least one of the extended actions exists in connection with selected objects. |
Note: Number of displayed objects in page can be set in the dialog box - click the item Settings from the menu System. If the page size is set to 0, visible number of lines will be displayed (you need to use the paging controls).
Mask
Mask allows faster searching for the objects, names of which have some common characters. You can use special characters in masks that are described in the following table.
| Character | Meaning |
|---|---|
| * | Substitutes arbitrary number of characters. |
| ? | Substitutes just one character. |
| [characters] | Allows to enter a few characters (without delimiter), that may occur on specific position. |
| [^characters] | Allows to enter a few characters (without delimiter), that may not occur on specific position. |
Only objects with names matching given mask will be included in the list of objects.
CNF Filter
The object selection by CNF filter is other way of object display. CNF filter allows a selection by individual columns which represent the object characters. It can not be used together with mask. Default way of selection is by mask. For selection the objects by CNF filter click on button .
Filter activation
The filter is activated by clicking on button .
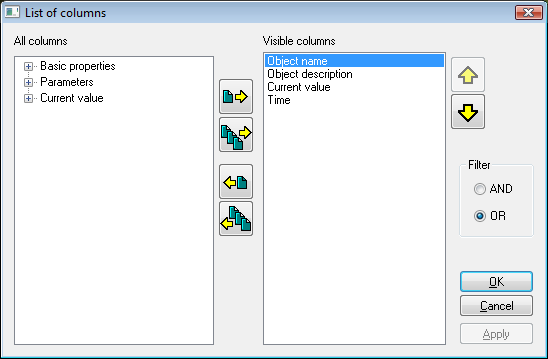
A user may set how the CNF filter should behave according to the defined conditions of filtering in individual items of columns (click on column by right mouse button and choose the item Columns). The dialog window List of columns opens.
It is possible to choose from two modes:
- "AND" – object conforms to conditions when all entered values of columns conform to conditions
- "OR" - object conforms to conditions when just one entered value of columns conforms to conditions
The settings are activated by clicking on button OK or Apply.
Working with filter
There are two ways to enter the value of columns for filter:
- to write a text directly into field of filter
- to select item from the range of items (this can be used only for listed types and references to object)
After the filter parameters was changed the filtering can start by clicking on button or key ENTER. If user clicks on button , all parameters for filtering are deleted.
Filter limitations
- Only columns that are not defined as "Nonfiltering item" can be filtered.
- Only the columns of type String and reference to object can be filtered by mask.
- Selection the item from range of items is possible only in columns of type:
- listed type: pop-up menu with offered items is appeared
- reference to object: dialog window for the object selection is appeared
- bitset: allows to create a field of bits by item selection from pop-up window
- Language ID must be set as the integral value, not as language name.
- Color that is displayed as undefined has a hexadecimal value.
- Upper quotation marks " " must be entered for the seeking of empty string (reference to object).
BITSET filtering
All set bits must match the filter. Example:
AND
| Object | 1 0 1 0 0 1 1 |
| Filter | 1 0 1 0 0 1 1 |
| Object | 1 0 1 0 0 1 1 |
| Filter | 1 0 0 0 0 1 1 |
Paging controls
If the list of objects is longer than can be displayed in the window page, then the list is divided into pages. You can use the buttons placed in the right top part of window to switch between them.
| Go to the first page of the list. | |
| Go to the previous page of the list. | |
| Number of the current page / number of all pages. | |
| Go to page entered in the input field of current page using the narrow buttons placed right, eventually directly enter the number of page. | |
| Go to the next page of the list. | |
| Go to the last page of the list. | |
| Opens a list of children of the object selected in the list (its shortcut is ALT+doubleclick). | |
| Returns to the previous parent list opened before clicking the button . |
Note:
When attempting to open next selection window and if a selection window is opened, the operator will be
notified to close the previous selection window. If the operator selects an object type, that is already
opened in another selection window, the particular selection window will be automatically closed.
For example: a selection window containing a list of pictures is opened, and the operator configures user
macros and clicks the selection window to select a picture.
New archival object
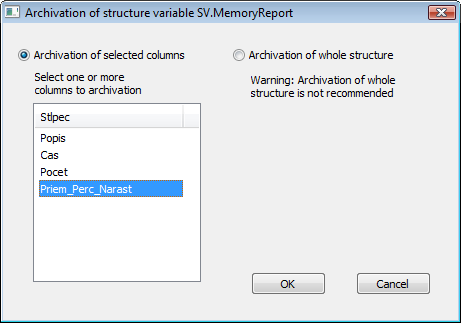
Chosen object can be assigned to archive by button To archive . If it concerns the object of Structured variable type, the dialog window opens to choose one of the options:
- archiving the selected columns
- archiving the whole structure
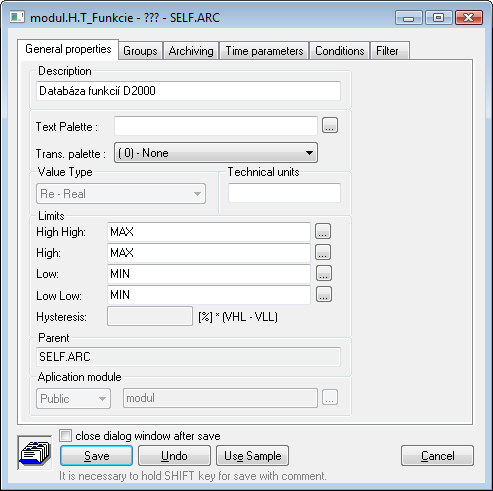
Clicking the OK button opens the dialog window for defining a new archive object. If more columns have been selected for archiving, a new dialog window with the archive object will be opened for each selected column.
Parameters Description (tab General properties) and Object to archive (tab Archiving) are taken automatically. Archival object gets a new prefix (usually H.). If one or more columns were selected, the name is supplemented by the symbol "_" and column name.
D2000 CNF remembers the setting of following parameters during the archival object creating:





Pridať komentár