Printing graphic information windows
To print use the following way:
- Open the graphic information window (picture, graph) to print on the desktop of the process D2000 HI.
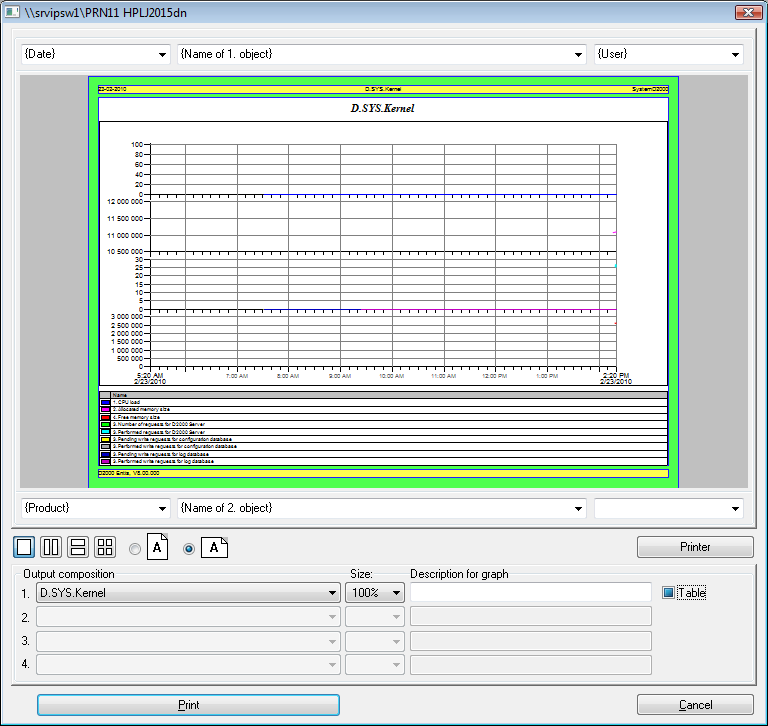
- Click the Print button from the Main toolbar (or press CTRL+P). Opened dialog box allows to define required print parameters.
- Define the print parameters according to your needs and click the Print button.
Description of the "Print" dialog box
Print preview
The large area in the top part of dialog box that shows the print output on page.
Header and footer
Input fields to enter parameters of header and footer are placed above and below the print preview. The input fields contain the menu of some predefined key words that will be replaced with current data during print. Meaning of these keywords is shown in the following table. Keywords are replaced with corresponding data only if the the text in particular input field does not contain other symbols.| Key word | Meaning |
|---|---|
| {Appl. Descrip} | Application descriptive text |
| {Date} | Date |
| {Date and Time} | Date and time |
| {Time and Date} | Time and date |
| {Product} | Product name |
| {Product and Logo} | Product name + Ipesoft's logo |
| {User} | Logged on user's name |
| {Name of 1. object} | Name of 1st window (2nd,...) |
| {Description of 1. object} | Description of 1st window (2nd,...) |
| {Name and description of 1. object} | Name and description of 1st window (2nd,...) |
Composition
Defines the maximum number of printed windows and their arrangement on page.
Orientation
Allows to select the page orientation - portrait or landscape.
Output composition
According to selected type of composition you can choose one of the opened windows or empty one. You can set the output size of each selected window and in case of pictures you can enable / disable the background printing.For objects of Graph type, the input field Edit contains the name and description, defined in the graph configuration. The description may be modified and will be shown above the graph in the print preview area. A change is to be displayed in the print preview after clicking out of the input filed Description.
Depending on the type of the object you want to print, there will be displayed either the checkbox Background (for compositions, pictures) or the checkbox Table (for graphs).
Background - enable / disable printing the object background.
Table - 3 possible states of the checkbox:
- print all column of the table
- print the column containing the object names
- do not print the table
Printer
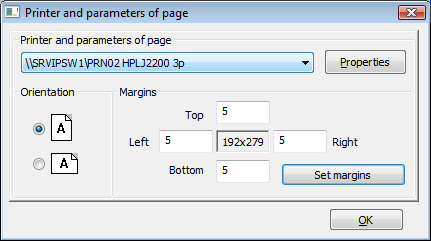
Printer and page setup.
Printer and page setup
Printer
It is selected from the list of output devices (printers) installed in the operating system.
Orientation
Select the page orientation - portrait or landscape. The parameter is synchronized with the parameter in the Print dialog box.
Margins
Set the margins that represent distances (in millimeters) of the printed graphic information window from the left, right, top and bottom margin of page - the Left, Right, Top and Bottom input boxes. Click the Set margins button to confirm entered values of margins.
Properties
This option allows changing the local settings of
printing for the selected printer, such as page layout, number of copies, print
format and others.
The parameters depend on a driver for given printer so the options, that they
allow to set, can vary. The changed settings will be applied only for the
current print and are not saved for the future use. After closing the Print
dialog window or changing the printer, the defined settings are reset and
the printer has the default properties. The new settings do not influence the
default print settings for the given printer.
Note: The information concerning the report printing from HI desktop you can find in the topic Print the report on printer.


Pridať komentár