...
- Start-up of the installation
- Registry check
- Installation guide
- License agreement
- Instance manager
- Type of installation
- Creating a new instance
- Finalization
...
In the next step, the installer checks and sets the redirection of registers, as 64-bit operating systems contain both 32-bit and 64-bit registers, which are accessible depending on the running process (32-bit or 64-bit). The D2000 System involves both 32-bit and 64-bit processes, therefore you must set the reading from just one type of the registry. Consequently, the reading is redirected to the registers corresponding to the operating system (i.e. 32-bit system -> 32-bit registers, 64-bit system -> 64-bit registers).
If this message occurs:

it suggests that the reverse redirection is set (all processes work with 32-bit registers). This means that registry redirection has been set on your computer before but to the opposite of the default value. In this case, the user should consider whether to keep these settings or not. If these settings remain, the D2000 System instances installed in the past are functional, too. However, if no instances are installed, it is better to change this setting to the default value.
This redirect can be changed on 64-bit systems, by changing value of the RegistryViewRedirect from 0 to 1 in registry branch "Computer\HKEY_LOCAL_MACHINE\SOFTWARE\Ipesoft\D2000" and from 1 to 0 in registry branch "Computer\HKEY_LOCAL_MACHINE\SOFTWARE\WOW6432Node\Ipesoft\D2000". The D2000 System is not dependent on the usage of 32-bit or 64-bit registers, but it cannot detect the change of this setting. Therefore, we recommend using the same redirection for all instances of the D2000 System and not changing it.
If this message occurs:
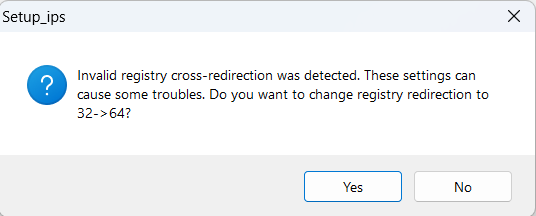
it means that the value of RegistryViewRedirect for both branches is set to 1. With this configuration the D2000 system will be unusable. If user presses "Yes" then the installer will set registry redirect to 64-bit branch. Alternatively user can end the installation prematurely and set values for RegistryViewRedirect in both branches manually.
Warning: The registry settings above mentioned remain changed only if the D2000 System has been modified in a computer (i.e. installed, upgraded, or uninstalled). If the user decides not to do any changes and aborts the installation, the original settings remain.
...
An installation guide is a tool that leads the user through the installation process. You may use the buttons, placed on the bottom left, to move back or forward or to cancel the installation. The individual steps inform about the current status or require to define the installation parameters.
...
The next dialog window contains the license agreement. To continue in the installation you must agree with the license agreement.

...
| Kotva |
|---|
...
|
...
4. Instance manager
...
After agreeing with the license agreementintroductory window, the new window opens to manage the instances. If any instance of the D2000 System has not been installed yet, this dialog window is skipped and the other window opens to set the new instance.
...
It enables us to manage all instances of the D2000 System on a computer. You may add, modify or remove the particular instances.
To copy files without installing a new instance, click on the parameter "Copy only". To install a new instance of the D2000 System, click on the parameter "Add a new instance". In case of changing the instance, the operation, which relates with the selected instance (i.e. "Repair instance", "Upgrade version" or "Downgrade version"), will be displayed. After selecting one of the options, or "Remove instance", the required operation will be started.
...
Warning: If you change the register redirection, this dialog window will not probably show the installed instances.
| Kotva |
|---|
...
If you have chosen the option "Add new instance", this dialog window opens.

In the left part, you may choose a type of installation that ensures installing of all necessary elements. Their short description is displayed in the right part.
...
...
|
...
5. Creating a new instance
...
After selecting the type of installation, the dialog box opens in which you have to set three parameters: Instance name, destination directory, and creation mode.
...
A destination directory is a place, which will contain the directory structure of the D2000 System (all necessary files and folders, e.g. D2000_EXE, D2Install, ExtInstallers, ...) after the installation of the instance. If this directory already contains any instance, the warning message occurs.
The name and path to the destination directory cannot contain any blank spaces.
Warning: Be Be aware that installing two instances in one directory can corrupt the files of one of them, so this installation procedure is not recommended!
In this dialog window, a user may choose one of two creation modes of a new instance:
...
...
| Kotva | ||||
|---|---|---|---|---|
|
...
In case of change or installation of the D2000 System, the D2Install - Configuration Guide is started automatically.
...