

...
Configuration Guide
...
To start the configuration guide, click on the file D2Install.exe in the directory that has been created when creating a new instance.

of the D2000 System
When d2msi starts, it will shown the welcome dialog.

The A structure of the configuration tool is similar to the installer. You may use the "Next" and "Back" buttons when you go through the configuration dialog windows. The "Install" button runs the final configuration.
At first, you have to specify the input configuration file in the initial window. There are two files you may choose - the default configuration file or own file.
The default configuration file D2install.xml contains the default settings of system. This file is used when choosing the option "Default configuration".
The configuration tool enables both the manual and automatic configuration. When you click on "Next" button, the manual configuration will be done. It means, the user is guided through all the necessary dialogs in which he may specify the system settings.
The "Install" button starts the automatic configuration according to chosen configuration. The user cannot change the configuration parameters. There will be used those from the defined configuration file.
A user has three options:
- Use the default configuration (D2install.xml) and manually pass the configuration guide.
- Specify own configuration file and manually pass the configuration guide.
- Specify own configuration file and automatically configure D2000 System without the guide.
When selecting the automatic configuration, all the steps that configure the system are skipped and the final configuration is started (see the section "Final configuration").
All the steps below will be done, when selecting the manual configuration.
Manual configuration
In the installation guide you could chose one of the following types of installation:
License Agreement
...
After the welcome dialog, we are shown the license agreement, before we can proceed to configuration of our installation.

Type of Installation
...
In the next dialog, we can choose what type instance are we going to install.

In the left part, you may choose a type of installation that ensures installing of all necessary elements. Their short description is displayed in the right part.
Configuration
...
...
Each type of installation requires the different system settings. Therefore, the installation guide is different for each installation. The steps of the configuration depend on the type of installation and the marked on checked parameters in the single dialog boxes.
The installation process is depicted on this configuration map.
individual dialogs.
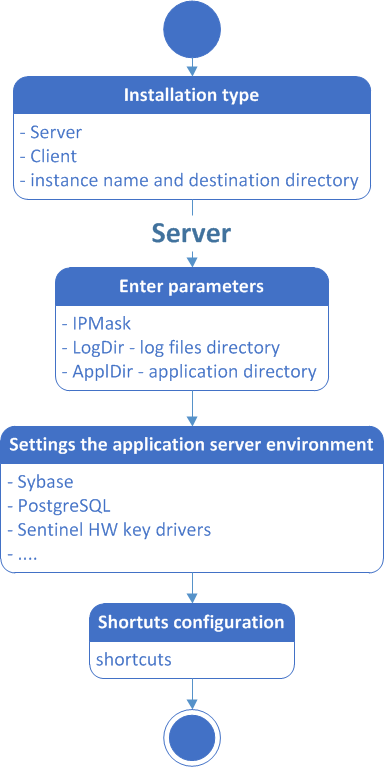
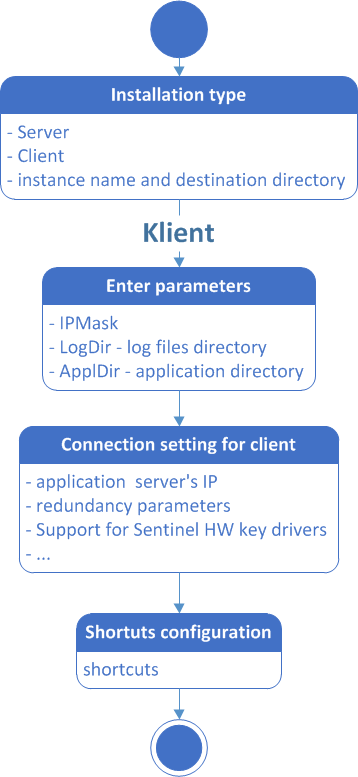

Each rectangle represents one or more configuration dialog dialogs for the setting of system parameters. The configuration proceeds according to the arrows. The upper point represents the start position, i.e. the configuration dialog in which you have to choose a type of installation. The end point endpoint represents a final configuration as per the settings.
Hint: Each step on the map represents a cross-reference which refers to related information in this text.
Configuration guide
...
...
1. Basic settings (all types of installation)
...


In this dialog window, you define the mask of network and the path to the basic directories necessary for the D2000 System operation:
- Application – the directory to which all files necessary for the application will be stored.
- Logging – the directory that will contain the information about the process activity of processes.
...
...
2. Server settings (Server)
...


Support programs
The options define which dialog is used to set up the installation of support programs , necessary for running of some parts of D2000 System, are to be installedthe D2000 system. If some of the options the option to install a program is checked, this the program will be installed after finishing the configuration is completed. If some of the items an item is checked and disabled, it means that the given program is installed present on the computer and need not be installed again.
Use hardware keys / Use software keys
Specifies the type of license keys that will be used for authentication in D2000 System.
...
your computer and no further installation is required.
3. Connection settings (Client)
...
Requires the setting of connection to the D2000 server. This is either an IP/Computer name or a name of the redundant group. This setting will be used for all configured clients.

4. Creating the shortcuts
...
This dialog box sets the presence and location of links to important D2000 processes. All links that have the "Add link" check box selected will be added to the resulting configuration. The link location setting is applied to all clients that have this parameter checked.
If no parameter is selected under the "Location" or "Add link" section, no link will be added to the computer.
A click on a button for particular client process opens a dialog window in which the user may change its start parameters.

5. Installation
...
After confirming our configuration we can start the installation.

6. Installation of supporting programs
...
After the installation, another installation of supporting programs will start, if we picked the option for it in the configuration.
In this case a dialog with a message will pop up on the screen, that will close itself when the installation of those programs ends.

7. Configuration of KOM and ARCHIVE processes (remote client)
...
After the installation of remote client, scsconfig.exe will be run, for you to configure processes for remote client.


In this dialog window, the user chooses which application will be created. There are three options:
- Demo application – it is a default application that is in the installation pack. In some versions of the installer the option could be disabled if it is not in the installation pack.
- New application – the user may define the application according to his requirements and parameters.
- No application – if no option is checked, the user need not configure any application and can smoothly proceed to other settings of the system.
The application may be created later it this step is skipped. You may do this in the module D2000 Application Manager.
...

When creating a demo application, there is only one parameter to be defined - Name.
...
When creating the new application, the parameters are set manually. As it requires to set a lot of parameters, it is recommended for the advanced users of D2000 System.
In addition, the dialog box enables to add an archive. This is optional and the archive can be added later in the module D2000 Application Manager.
...
Application settings for SYBASE platform

...
The created engine can be set or edited in this dialog window.

The parameters Name (unique) and Parameters You have to specify the unique name of engine and the parameters related to its operations.
The start parameter of engine are entered in the text box Parameters. If the box is empty, d2install adds the default parameters automatically. The engine name must be unique and explicit, otherwise an error message occurs.
...
- Archive settings for Sybase platform

In the dialog box above, you have to select (or create) the engine for the archive database. The steps are the same as when setting the engine for the application on Sybase platform. - Archive settings for MSSQL platform

The parameters are similar to the archive settings on Sybase platform. In addition, there are the parameters Login and Password. The database engine must be selected from the existing ones. If no engine is accessible, the archive on MSSQL platform cannot be established. - Archive settings for Oracle platform

The description on how to set the parameters for the application on Oracle platform is stated in reference guide for D2000 System.
...
In this dialog window, a user may set the automatic startup of D2MC, which is used for managing the D2000 System.

...
It requires to set the connection to D2000 Server. It is either IP/Computer name or name of redundant group. This setting is determined for all configured clients.

...
This dialog window enables to define which support programs are to be installed for the client processes. It is the support for HW keys.

...
In this dialog window user may set the shortcuts of the important processes of D2000 System and their placement. The final configuration will contain all links that are checked in the column "Add shortcut". If any parameter is not checked, no shortcut will be created in the computer. 
Double click on the particular client process opens the dialog window in which user may change its relative location ("Name" item) and the start parameters ("Parameters" item).

...
Next step enables to configure the remote processes of D2000 System. If you check the checkbox in the "Install" column means that the given process will be created.

Double click over the remote client to open the configuration dialog box, in which the user may set next parameters.

The detailed parameters of remote client are described in the D2000 System Configuration Reference Manual.
Confirming a configuration
Before the final configuration, you must confirm the configuration.

The user may start the application or save the final configuration file for further usage.
Regardless of user decision, the final configuration is always stored to the folder D2Install in a target directory where is an instance of installation.
...
The final configuration is done automatically. In the dialog window, the user can see the information about each step of configuration. It also displays the information about the success or failure of the given step.

After finishing the configuration, the Complete button to close the guide is enabled. In this step the instance of D2000 System is installed, configured and ready for use.
| Info | ||
|---|---|---|
| ||