All tables in the new user interface contain common functionalities, which are described in detail in this chapter. Each table does not have to contain all the functionalities described here, but only those that make sense. Table configuration such as e.g. order, visibility of columns, their width is in most cases saved automatically after closing the window (it is also possible to save it explicitly).
| Info |
|---|
This chapter describes the functionality of the new user interface available since |
Všetky tabuľky v novom používateľskom rozhraní obsahujú spoločné funkcionality, ktoré sú detailne popísané v tejto kapitole. Každá tabuľka nemusí obsahovať všetky tu popísané funkcionality, ale iba tie ktoré dávajú zmysel. Konfigurácia tabuľky ako je napr. poradie, viditeľnosť stĺpcov, ich šírka sa vo väčšine prípadov ukladá automaticky po zatvorení okna (je ju možné uložiť aj explicitne).
| Info |
|---|
Táto kapitola popisuje funkcionality nového používateľského rozhrania dostupného od verzie D2000 V12.2. |
| Obsah | ||
|---|---|---|
|
Ovládací panel nad tabuľkou
Nad tabuľkou sa nachádza panel s tlačidlami, vyhľadávacím polom a stránkovaním (v prípade ak tabuľka je nastavená tak, aby údaje stránkovala).
![]() Panel nad tabuľkami poskytuje všeobecné funcionality pre tabuľku a jej dáta. Celkom vľavo sú ovládacie tlačidlá, nasleduje vyhľadávacie textové pole s tlačidlom vyhľadať.
Panel nad tabuľkami poskytuje všeobecné funcionality pre tabuľku a jej dáta. Celkom vľavo sú ovládacie tlačidlá, nasleduje vyhľadávacie textové pole s tlačidlom vyhľadať.
Za ním je úvedená pozícia práve zobrazených záznamov s celkovým počtom záznamov. Úplne napravo sú strankovacie tlačidlá.
Ovládacie tlačidlá nad tabuľkou
Control panel above the table
Above the table, there is a panel with buttons, search box and paging (if the table is set to page data).
![]() The panel above the tables provides general functionalities for the table and its data. To the far left are the control buttons, followed by a search text box with a search button.
The panel above the tables provides general functionalities for the table and its data. To the far left are the control buttons, followed by a search text box with a search button.
Behind it is the position of the currently displayed records with the total number of records. To the far right are the paging buttons.
Control buttons above the table
The functionalities of the buttons above the table are as followsFunkcionality tlačidiel nad tabuľkou sú nasledovné:
![]() /
/![]() - skrývanie/zobrazovanie filtra vľavo od tabuľky, toto tlačidlo je prítomné iba v prípade ak je pre tabuľku implementovaný panel s filterovacími položkamihide/show filter to the left of the table, this button is present only if a panel with filter items is implemented for the table
- skrývanie/zobrazovanie filtra vľavo od tabuľky, toto tlačidlo je prítomné iba v prípade ak je pre tabuľku implementovaný panel s filterovacími položkamihide/show filter to the left of the table, this button is present only if a panel with filter items is implemented for the table
![]() /
/![]() - toto tlačidlo znamená že údaje v tabuľke sú priebežne automaticky aktualizované. Je tu preto možnosť zapnuť sledovanie naposledy pridaného záznamu do tabuľky, pokiaľ je do tabuľky pridaný nový záznam (napr. alarm, monitorovaná udalosť a pod.). Zapnutím tohto nastavenia sa tabuľka automaticky naskroluje/nastránkuje tak, aby bol tento naposledy pridaný záznam viditeľný. Zapnutie tohto tlačidla automatický nastaví aj zoraďovanie záznamov tak, aby nové záznamy boli pridávané chronologicky na koniec tabuľky (tabuľka sa teda automaticky vzostupne podľa stĺpca s časom). Sledovanie naposledy pridaného záznamu sa automaticky zruší pri akejkoľvek manipulácii s tabuľkou používateľom (napr. vyber riadka, manuálne odskrolovanie nahor, zmena zoraďovania kliknutím na hlavičku stĺpca a podthis button means that the data in the table is continuously updated automatically. Therefore, it is possible to turn on the monitoring of the last record added to the table, if a new record is added to the table (e.g. alarm, monitored event, etc.). Enabling this setting will automatically scroll/page the table so that this last added entry is visible. Turning on this button automatically sets the sorting of records so that new records are added chronologically to the end of the table (the table is automatically ascending according to the time column). Tracking of the last added record is automatically cancelled whenever the user manipulates the table (e.g. selection of a row, manually scrolling up, changing the order by clicking on the column header, etc.).
- toto tlačidlo znamená že údaje v tabuľke sú priebežne automaticky aktualizované. Je tu preto možnosť zapnuť sledovanie naposledy pridaného záznamu do tabuľky, pokiaľ je do tabuľky pridaný nový záznam (napr. alarm, monitorovaná udalosť a pod.). Zapnutím tohto nastavenia sa tabuľka automaticky naskroluje/nastránkuje tak, aby bol tento naposledy pridaný záznam viditeľný. Zapnutie tohto tlačidla automatický nastaví aj zoraďovanie záznamov tak, aby nové záznamy boli pridávané chronologicky na koniec tabuľky (tabuľka sa teda automaticky vzostupne podľa stĺpca s časom). Sledovanie naposledy pridaného záznamu sa automaticky zruší pri akejkoľvek manipulácii s tabuľkou používateľom (napr. vyber riadka, manuálne odskrolovanie nahor, zmena zoraďovania kliknutím na hlavičku stĺpca a podthis button means that the data in the table is continuously updated automatically. Therefore, it is possible to turn on the monitoring of the last record added to the table, if a new record is added to the table (e.g. alarm, monitored event, etc.). Enabling this setting will automatically scroll/page the table so that this last added entry is visible. Turning on this button automatically sets the sorting of records so that new records are added chronologically to the end of the table (the table is automatically ascending according to the time column). Tracking of the last added record is automatically cancelled whenever the user manipulates the table (e.g. selection of a row, manually scrolling up, changing the order by clicking on the column header, etc.).
| Kotva | ||||
|---|---|---|---|---|
|
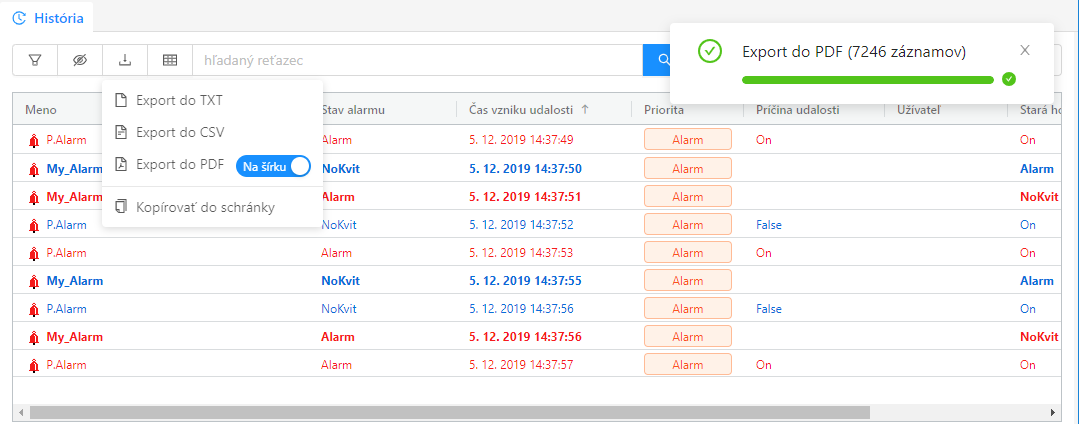 Exportovanie všetkých záznamov do PDF cez dropdown menu tlačidla export. Vpravo hore sa zobrazuje progres celého exportu na konci ktoré sa zobrazí štandardný dialóg na uloženie súboru.
formats or to the clipboard
Export all records to PDF via the dropdown menu of the export button. At the top right, the progress of the entire export is displayed at the end, which displays the standard dialog for saving the file.
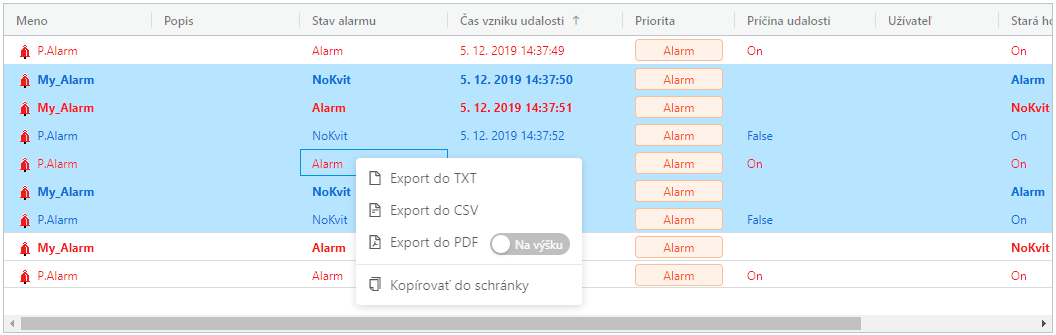 Export only selected table entries via the right-click context menuExportovanie iba vybraných záznamov tabuľky cez kontextové menu vyvolané pravým tlačidlom myši.
![]() - menu s rozšírenými možnosťami tabuľky poskytuje nasledovnéthe menu with advanced table options provides the following:
- menu s rozšírenými možnosťami tabuľky poskytuje nasledovnéthe menu with advanced table options provides the following:
- Column Filter nad stĺpcami - zapína zobrazovanie vyhľadávacích textových polí pod názvami stĺpcov. Cez ktoré je možné filtrovať riadky podľa toho či obsahujú zadaný reťazec v danom stĺpci. Podporené je aj zadávanie zástupných znakov * a ? pre špecifické požiadavky.
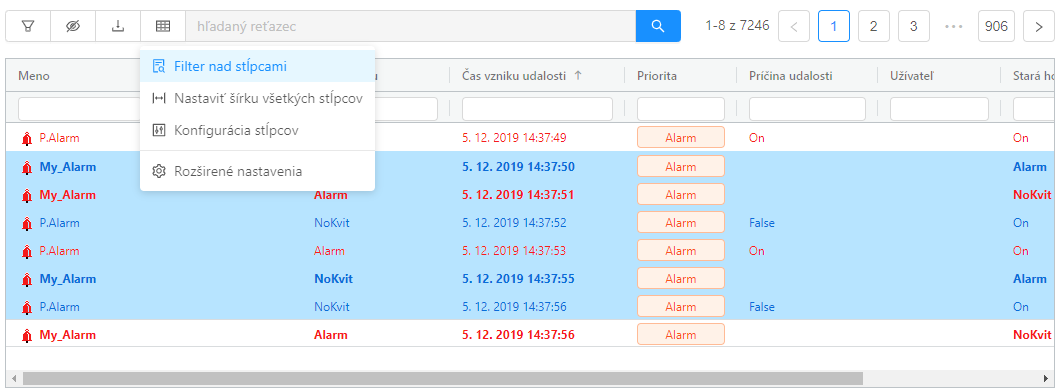
Zapnutie filtra nad stĺpcami umožní zadávať vyhľadávací reťazec samostatne pre každý stĺpec .
- Nastaviť šírku všetkých stĺpcov - nastaví šírku zobrazených stĺpcov tak, aby ich obsah bol viditeľný.
- Konfigurácia stĺpcov - zobrazí dialóg pre nastavenie viditeľnosti a poradia stĺpcov v tabuľke
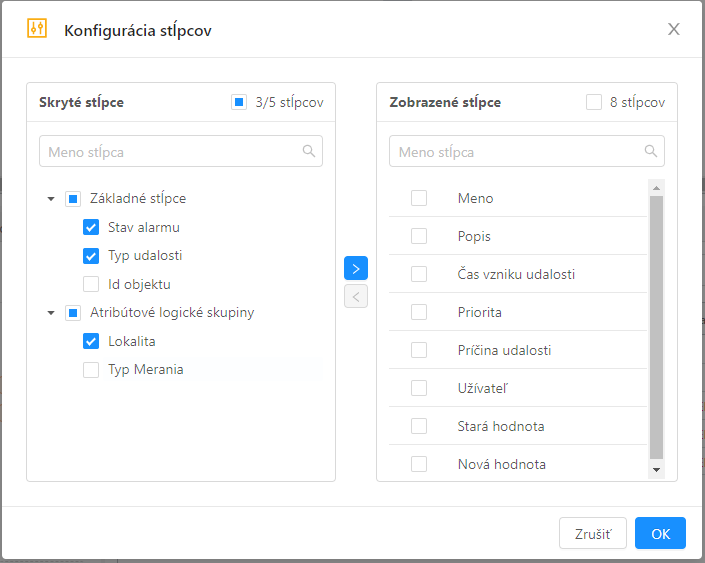 Dialóg konfigurácie stĺpcov tabuľky. Na pravej strane je v paneli zobrazený strom skrytých stĺpcov logicky členený do skupín.
Na ľavej strane je v paneli zoznam viditeľných (zobrazených) stĺpcov, poradie stĺpcov je možné meniť ich posúvaním myšou spôsobom drag&drop.
Skrývanie a zobrazovanie stĺpcov sa realizuje presunom vybraných (zaškrtnutých) stĺpcov prostredníctvom tlačidiel medzi panelmi.
- Rozšírené nastavenia tabuľky - v pravej časti obrazovky sa zobrazí panel s rozšírenými nastaveniami tabuľky, jeho funkcionalita je popísaná v samostatnej podkapitole.
Textové pole na rýchle filtrovanie v tabuľke
Nad tabuľkou sa nachádza aj vyhľadávacie pole s tlačidlom vyhladania zaznamov. Može vypadať nasledovne:
...
![]() - v prípade ak zástupný text v textovom poli obsahuje názvy stĺpcov tabuľky (napr. "meno objektu"), vyhľadávanie funguje inak ako v predchádzajúcom prípade. Takéto textové pole umožňuje vyhľadávať napr. iba v mene objektu, V tomto paneli je potrebné explicitne stlačiť tlačidlo vyhľadávania
- v prípade ak zástupný text v textovom poli obsahuje názvy stĺpcov tabuľky (napr. "meno objektu"), vyhľadávanie funguje inak ako v predchádzajúcom prípade. Takéto textové pole umožňuje vyhľadávať napr. iba v mene objektu, V tomto paneli je potrebné explicitne stlačiť tlačidlo vyhľadávania ![]() po zadaní hľadaného textu. Dôvod prečo tento panel funguje inak ako ostatné je ten, že v tomto prípade nie sú všetky dáta načítané do tabuľky naraz, ale z kernela sa načítavajú iba aktuálne zobrazené záznamy. Z tohto dôvodu filtrovanie záznamov na obsah zadaného reťazca realizuje kernel (s obmedzenou funkcionalitou filtrovania iba na niektoré stĺpce, v porovnaní s predchádzajúcou možnosťou, kedy tabuľka vyhľadáva text vo všetkých záznamoch a stĺpcoch).
po zadaní hľadaného textu. Dôvod prečo tento panel funguje inak ako ostatné je ten, že v tomto prípade nie sú všetky dáta načítané do tabuľky naraz, ale z kernela sa načítavajú iba aktuálne zobrazené záznamy. Z tohto dôvodu filtrovanie záznamov na obsah zadaného reťazca realizuje kernel (s obmedzenou funkcionalitou filtrovania iba na niektoré stĺpce, v porovnaní s predchádzajúcou možnosťou, kedy tabuľka vyhľadáva text vo všetkých záznamoch a stĺpcoch).
| Tip |
|---|
V prípade vyhľadávacieho poľa pre meno objektu je pomocou kľučových slov "AND" alebo "OR" možné vyhľadávať aj v jeho popise (napr. vyhľadávací reťazec: |
- - turns on the display of search text boxes below column names, through which it is possible to filter rows according to whether they contain the specified string in a given column. Wildcards * and ? are also supported for specific requirements.
Turning on the filter above the columns allows you to enter a search string separately for each column.
- Set width of all columns - sets the width of the displayed columns so that their contents are visible.
- Column Configuration - displays a dialog for setting the visibility and order of the columns in the table
Table column configuration dialog. On the right side, the panel shows a tree of hidden columns logically divided into groups.
On the left side, there is a list of visible (displayed) columns in the panel, the order of columns can be changed by dragging and dropping the mouse.
Hiding and showing columns is done by moving selected (checked) columns using the buttons between the panels.
- Advanced table settings - in the right part of the screen the panel with advanced table settings will be displayed, its functionality is described in a separate subchapter.
Text box for quick filtering in a table
Above the table, there is also a search box with a record search button. It can look like this:
 - if the placeholder text in the text field is currently a "search string", the search field is intended for automatic full-text search of a part of the text in all columns of the table. When you type text in a field, only records that contain that text in at least one column (whether or not the column is visible) are automatically displayed in the table. It is possible to enter more search strings in the text field separated by space, in this case, the displayed record must contain all search strings. Of course, it is possible to use wildcards * (0-n characters) and ? (just 1 character) in strings. Filtering according to the entered text is performed directly by the table above the already loaded records (the table has completely loaded all records, even those that are not displayed). If we want to update the data in the table, it is necessary to press the search button
  after the text field. This button reloads the data into the table from the server.
 - if the placeholder text in the text box contains table column names (such as "object name"), the search works differently than in the previous case. Such text field allows you to search in the name of the object. In this panel, it is necessary to explicitly press the search button after entering the search text. The reason why this panel works differently than the others is that in this case not all data is loaded into the table at once, but only the currently displayed records are read from the kernel. For this reason, filtering records for the contents of the specified string is performed by the kernel (with the limited filtering functionality on some columns, compared to the previous option, where the table searches for text in all records and columns).
Tip In the case of a search field for an object name, it is also possible to search in its description using the keywords "AND" or "OR" (eg search string:
*M* AND *P*searches for all objects that have the letter M in their name and in the description object is the letter P).
Orientation and navigation of the table
The tables show the interval of the currently displayed records in the table in the upper right part. For pages that have paging settings, paging buttons are also displayed, through which you can quickly jump to the next or previous pages, or the first and last page by clicking.
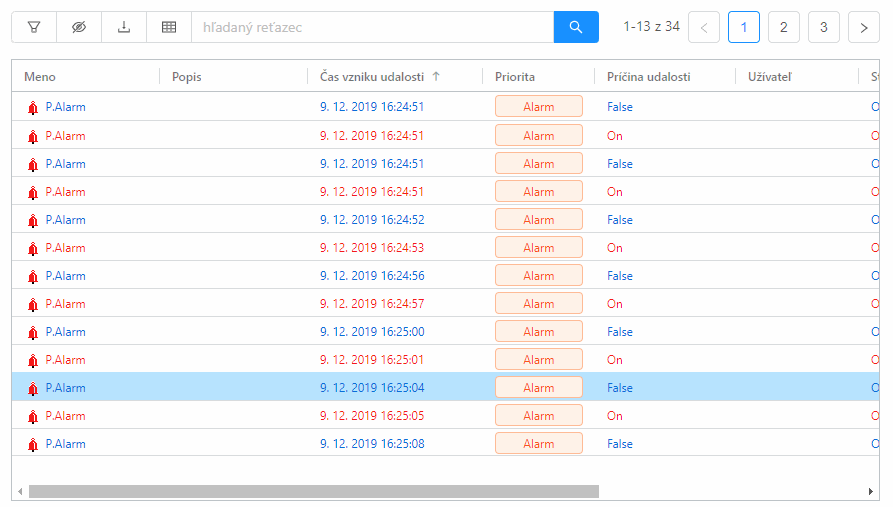
![]() The table currently shows the first to tenth record out of a total of 7246 records.
The table currently shows the first to tenth record out of a total of 7246 records.
The data is therefore paged after 10 records per page, in total we have 725 pages available.
We are currently on the first page. Click on buttons 2, 3, 725 to jump to the given page.
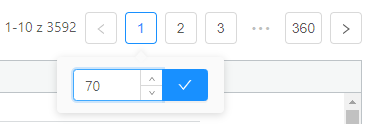 After moving the mouse over the button with the number of the currently displayed page, a popup bubble will appear with the option to enter any page number to which we want to jump to.
In this case, we entered page number 70. After pressing the button ![]() , the records of page 70 will be displayed in the table.
, the records of page 70 will be displayed in the table.
You can also use the keys PGUP (go back one page), PGDOWN (go to the next page), HOME (go to the first page), END (go to the last page) to navigate the table.
You can also use the mouse wheel to scroll vertically on a scrollbar table; if you hold down the SHIFT key, you scroll horizontally to columns that did not fit on the screen instead of vertically scrolling.
Working with columns in a table
Each table allows the following column functionalities:
- change the width of the column by moving the right edge of the column header
- automatic change of column width to suitable by double-clicking on the right edge of the column header
- sorting by clicking on the column header according to which it is to be sorted, repeated clicking sets the sorting order in ascending or descending order
- if the table supports it, it is possible to use sorting by several columns at once by successively clicking on the column headers while holding down the CTRL key
- move columns with the mouse by drag & drop by moving the column header
- pin a column to the right or left edge of the table by holding down the column over the left or right edge of the table
 How to attach a column to the left edge of a table.
After moving the cursor over the column name, a drop-down menu icon ![]() with items for column settings will appear in its right part (alternatively the menu can also be called up by right-clicking on the column name).
with items for column settings will appear in its right part (alternatively the menu can also be called up by right-clicking on the column name).
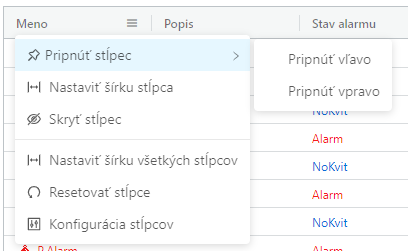
Drop-down menu for a column called "Name"
The context menu for the column contains the following items:
- Pin Column - allows you to pin or unpin multiple columns to the left or right edge of the table. These columns always remain visible, while the other columns remain in the center of the table with the horizontal scroll bar.
- Set column width - automatically sets the column width so that the displayed column content is as visible as possible (this can also be achieved by double-clicking on the right edge of the column)
- Hide column - the column will be hidden and will not be visible until the user re-enables visibility in the column configuration or by resetting their settings
- Set the width of all columns - analogous to "Set column width" but the operation will be performed on all columns
- Reset columns - reset the position, width and size of the columns to the default column settings
- Column Configuration - displays the configuration dialog for showing and hiding columns (described above)
Marking records in a table
Individual records are marked in the table by clicking on the row with the record. To perform an operation on a group of multiple records, they must first be marked, and it is possible to mark a contiguous or discontinuous group of records.
Marking of a continuous group of alarms
- Click on the first alarm in the group.
- Press and hold the
SHIFTkey. - Click on the last alarm in the group.
Alternatively, you can select only with the mouse as follows.
- Click and hold the first alarm in the group.
- Move the mouse to the last alarm in the group.
- Release the mouse button
Marking of a discontinuous group of alarms
- Press and hold
CTRLkey. - Click on the alarm names to gradually add the required alarms to the group. Clicking on an already added entry will remove that entry from the group.
Selecting from all visible records
- Press
CTRL+A -all currently visible table records are be selected.
Copying the contents of the table to the clipboard
There are three ways to copy the contents of a spreadsheet
- with the keyboard shortcut
CTRL+Cit is possible to copy the currently marked (focused) table cell.
The blue border of the cell indicates the currently selected cell -the contents of which can be copied
- by exporting to the clipboard either the entire table or only selected rows
Advanced settings
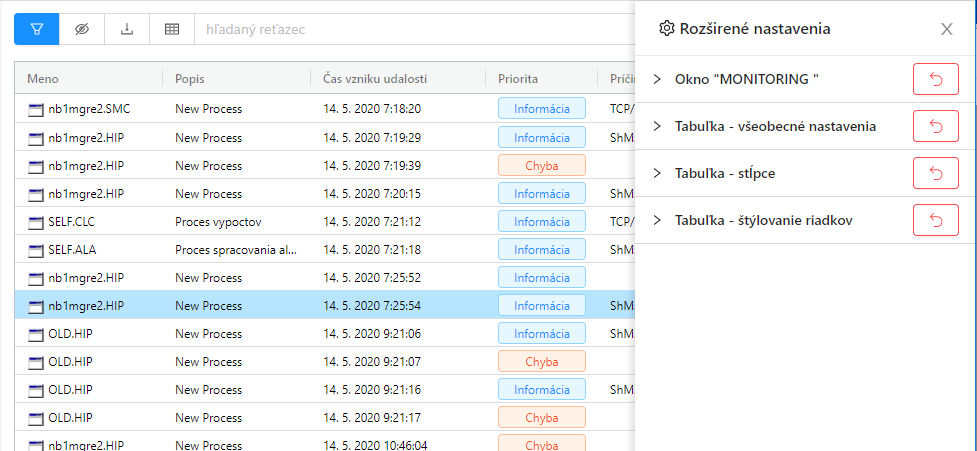
The panel with advanced settings can be displayed via the menu from the button ![]() above the table. The panel appears on the right side of the screen and contains several expandable sub-panels.
above the table. The panel appears on the right side of the screen and contains several expandable sub-panels.
Advanced monitoring window settings
Orientácia a navigácia po tabuľke
V tabuľkách sa v pravej hornej časti zobrazuje interval aktuálne zobrazených záznamov v tabuľke. Pre stránky ktoré majú nastavené stránkovanie sa zobrazujú aj stránkovacie tlačidlá, cez ktoré je možné kliknutím rýchlo skočiť na najbližšie nasledujúce alebo predchádzajúce stránky, alebo prvú a poslednú stránku.
![]() V tabuľke je aktuálne zobrazený prvý až desiaty záznam z celkovo 7246 záznamov.
V tabuľke je aktuálne zobrazený prvý až desiaty záznam z celkovo 7246 záznamov.
Údaje sú teda nastránkované po 10-tich záznamoch na stránku, celkovo máme k dispozícii 725 stránok.
Aktuálne sme na prvej stránke. Kliknutím na tlačidlá 2, 3, 725 skočíme na danú stránku.
Po presunutí myši nad tlačidlo číslom aktuálne zobrazenej stránky sa zobrazí popup bublina s možnosťou zadať ľubovolné číslo stránky, na ktorú chceme skočiť.
V tomto prípade sme zadali číslo stránky 70. Po stlačení tlačidla ![]() sa v tabuľke zobrazia záznamy stránky 70.
sa v tabuľke zobrazia záznamy stránky 70.
Pre navigáciu po tabuľke je možné použíť aj klávesy PGUP (posun späť o jednu stránku), PGDOWN (posun na nasledujúcu stránku), HOME (skok na prvú stránku), END (skok na poslednú stránku).
Pre vertikálne skrolovanie po tabuľke so scrollbarom je možné použiť aj koliesko myši, v prípade podržanej klávesy SHIFT sa namiesto vertikálneho skrolovania uskutočnuje horizontálne skrolovanie k stĺpcom, ktoré sa nezmestili na obrazovku.
Práca so stĺpcami v tabuľke
Každá tabuľka umožňuje nasledovné funkcionality so stĺpcami:
- zmena šírky stĺpca spôsobom posúvaním pravého okraja hlavičky stĺpca
- automatická zmena šírky stĺpca na najlepšiu vhodnú dvojklikom na pravý okraja hlavičky stĺpca
- sortovanie kliknutím na hlavičku stĺpca podľa ktorého sa má sortovať, opakovaným kliknutím sa nastavuje vzostupne alebo zostupne radenie sortovania
- ak to tabuľka podporuje je možné použiť sortovanie podľa viacerých stĺpcov naraz prostredníctvom postupných kliknutí na hlavičky stĺpcov pri držaní klávesy CTRL
- presúvanie stĺpcov myšou spôsobom drag&drop presunutím hlavičky stĺpca
- pripnutie stĺpca k pravému alebo ľavému okraju tabuľky dlhším podržaním stĺpca nad lavým alebo pravým okrajom tabuľky
Spôsob pripínania stĺpca k ľavému okraju tabuľky.
Po presunutí kurzora nad názov stĺpca sa v jeho pravej časti zobrazí rozbalovateľná menu ikona ![]() s položkami pre nastavenie stĺpca (alternatívne sa menu dá vyvolať aj pravým klikom nad názov stĺpca).
s položkami pre nastavenie stĺpca (alternatívne sa menu dá vyvolať aj pravým klikom nad názov stĺpca).
Rozbalovateľné menu pre stĺpec s názvom "Meno".
Kontextové menu pre stĺpec obsahuje nasledovné položky:
- Pripnúť stĺpec - umožňuje pripnúť alebo odopnúť aj viacero stĺpcov k ľavému alebo pravému okraju tabuľky. Tieto stĺpce zostávajú vždy viditeľné, pričom ostatné stĺpce ostávajú v strede tabuľky aj s horizontálnym posuvníkom.
- Nastaviť šírku stĺpca - automaticky nastaví šírku stĺpca tak aby bol zobrazovaný obsah stĺpca čo najviac viditeľny (uvedené je možné dosiahnuť aj dvojklikom na pravom okraji stĺpca)
- Skryť stĺpec - stĺpec sa skryje a nebude viditeľný, pokial používateľ znova jeho viditeľnosť nezapne v konfigurácii stĺpcov alebo resetovaním ich nastavenia
- Nastaviť šírku všetkých stĺpcov - analogicky ako"Nastaviť šírku stĺpca" ale operácia sa vykoná nad všetkými stĺpcami
- Resetovať stĺpce - resetovanie polohy, šírky aj veľkosti stĺpcov do východzieho nastavenia stĺpcov
- Konfigurácia stĺpcov - zobrazí konfiguračný dialóg zobrazovania a skrývania stĺpcov (popísaný vyššie)
Označovanie záznamov v tabuľke
Jednotlivé záznamy sa v tabuľke označujú kliknutím myši na riadok so záznamom. Na vykonanie operácie nad skupinou viacerých záznamov je ich nutné najprv označiť, pričom je možné označiť súvislú alebo nesúvislú skupinu záznamov.
Označenie súvislej skupiny alarmov
- Kliknite myšou na prvý alarm v skupine.
- Stlačte klávesu
SHIFTa držte ju stlačenú. - Kliknite myšou na posledný alarm v skupine.
Alternatívne je možné vykonať označenie iba myšou nasledovne.
- Kliknite myšou na prvý alarm v skupine a podržte tlačidlo myši.
- Presunte sa myšou na posledný alarm v skupine.
- Pustite tlačidlo myši
Označenie nesúvislej skupiny alarmov
- Stlačte klávesu
CTRLa držte ju stlačenú. - Klikaním myši na názvy alarmov postupne pridávajte do skupiny požadované alarmy. Kliknutím na už pridaný záznam sa tento záznam zo skupiny odoberie.
Výber všetkých viditeľných záznamov
- Stlačte klávesy
CTRL+A, mali by sa označiť všetky aktuálne viditeľné záznamy tabuľky.
Kopírovanie obsahu tabuľky do schránky
Kopírovať obsah tabuľky je možný troma spôsobmi
- klávesovou skratkou
CTRL+Cje možné skopírovať aktuálne označenú (focusnutú) bunku tabuľky.
Modré orámovanie bunky označuje - aktuálne vybranú bunku, ktoréj obsah sa dá kopírovať
- exportom do schránky buď celej tabuľky alebo iba vybraných riadkov
Rozšírené nastavenia
Panel s rozšírenými nastaveniami je možné zobraziť prostredníctvom menu z tlačidla ![]() nad tabuľkou. Panel sa zobrazuje na pravej strane obrazovky a obsahuje niekoľko rozbalovateľných sub-panelov.
nad tabuľkou. Panel sa zobrazuje na pravej strane obrazovky a obsahuje niekoľko rozbalovateľných sub-panelov.
Rozšírené nastavenia monitorovacieho okna
| Kotva | ||||
|---|---|---|---|---|
|
...
Prvý rozbalovateľný panel má meno aktuálne otvoreného okna, a je prostredníctvom neho možné spravovať konfiguráciu celého okna. Tá obsahuje nastavenia nielen celej tabuľky ale aj ostatných komponentov v okne ako je napr. panel s filtrom (v tomto pripade sa ukladá napr. aj aktuálne zvolený filter).
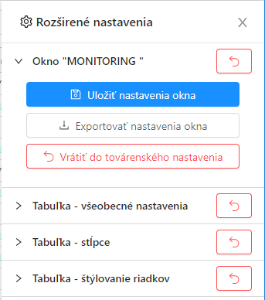
Panel obsahuje nasledujúce tlačidlá:
 - vrátenie konfigurácie celého okna do predvoleného nastavenia načítaného pri otvorení obrazovky
 - uloženie konfigurácie okna. Konfigurácia sa ukladá podľa typu okna buď do registrov na lokálnom počítači (väčšina okien) alebo do nastavení užívateľa (alarmové okno, predkonfigurované monitorovacie okná )
 - export konfigurácie okna do súboru na disk
 - vrátenie konfigurácie celého okna do nastavenia predvoleného výrobcom systému
Panel Tabuľka - všeobecné nastavenia
Vo všeobecných nastaveniach tabuľky je možné nastaviť nasledovné:
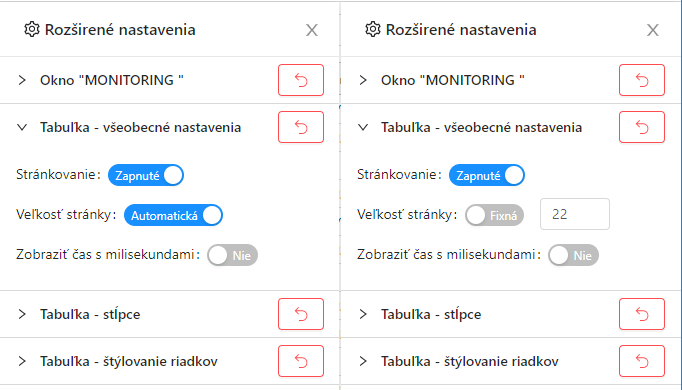
- zapnutie/vypnutie stránkovania - v prípade vypnutého stránkovania sa záznamy v tabuľke nerozdelia na stránky ale sú v jednom veľkom skrolovateľnom zozname.
- v prípade zapnutého stránkovania je možné definovať počet záznamov na stránku. Buď je nastavená automatická veľkosť stránky podľa dostupného priestoru v okne alebo je možné túto veľkosť nastaviť na fixný počet záznamov
- v prípade tabuľky so stĺpcom zobrazujúcim čas, je možné nastaviť aj zobrazovanie milisekúnd
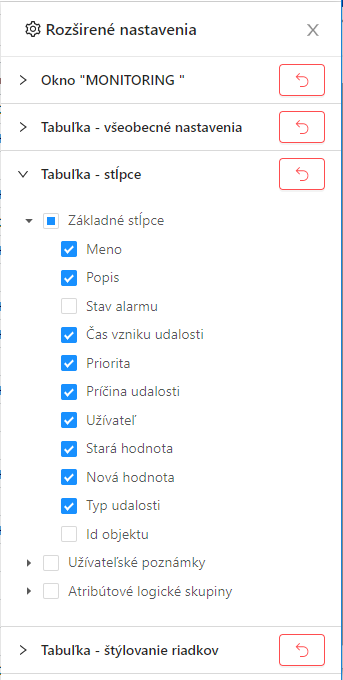
Panel Tabuľka - stĺpce
Tento panel umožňuje skrývať a zobrazovať dostupné stĺpce tabuľky. Stĺpce sú orientované do skupín.
Panel Tabuľka - štýlovanie riadkov
Posledný panel v nastaveniach tabuľky umožňuje meniť veľkosť a štýlovanie riadkov poďľa obsahu jednotlivých záznamov. V každej tabuľke je možné cez tento panel meniť veľkosť fontu všetkých riadkov tabuľky. Pre niektoré tabuľky (napr. v okne monitorovanie alebo alarmy), je možné definovať aj farbu textu, pozadia a silu písma (bold) na základe hodnôt v zázname (napr. vyfarbovanie aktívnych nepotvrdených alarmov).
Window panel
The first drop-down panel is named the currently open window, and it is impossible to manage the configuration of the entire window through it. It contains settings not only of the whole table, but also of other components in the window such as e.g. filter panel (in this case, for example, the currently selected filter is saved).
The panel contains the following buttons:
- - returns the configuration of the entire window to the default settings loaded when the screen is opened
- - saves the window configuration. Depending on the window type, the configuration is saved either in the registers on the local computer (most windows) or in the user settings (alarm window, preconfigured monitoring windows)
- - exports window configuration to a file on disk
- - return the configuration of the entire window to the default settings of the system manufacturer
Table Panel - general settings
The following can be set in the general settings of the table:
- on/off paging - in case of paging off, the entries in the table are not divided into pages but are in one large scrollable list.
- if paging is enabled, you can define the number of records per page. Either the automatic page size is set according to the available space in the window or it is possible to set this size to a fixed number of records
- in the case of a table with a column showing the time, it is also possible to set the display of milliseconds
Table Panel - Columns
This panel allows you to hide and show the available table columns. Columns are grouped.
Table Panel - row style
The last panel in the table settings allows you to change the size and style of rows according to the content of individual records. In each table, it is possible to change the font size of all rows of the table via this panel. For some tables (e.g.. in the monitoring or alarms window), it is also possible to define the text colour, background and font strength (bold) based on the values in the record (e.g. colouring of active unacknowledged alarms).
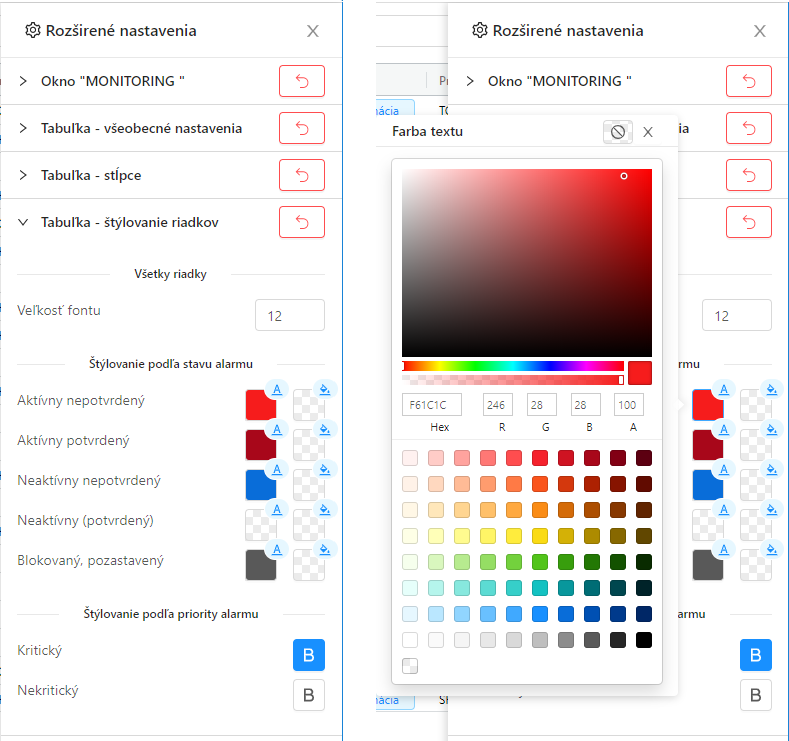
After clicking on the colour box, a popup will appear with the option to select a new colour
Po kliknutí na políčko s farbou sa zobrazí popup s možnosťou výberu novej farby.